Rack of Goat Lives On
A guest post by Mrs. Esquire
The Big Green Egg influences our meals even when we don’t fire it up
It’s a busy weeknight. While we love grilling on our Big Green Egg for any meal, there are nights when we’re pressed for time, and throwing something together on the range is all we have the capacity to do. But even on these occasions, there are ways that our Big Green Egg can continue to influence and flavor our meals.
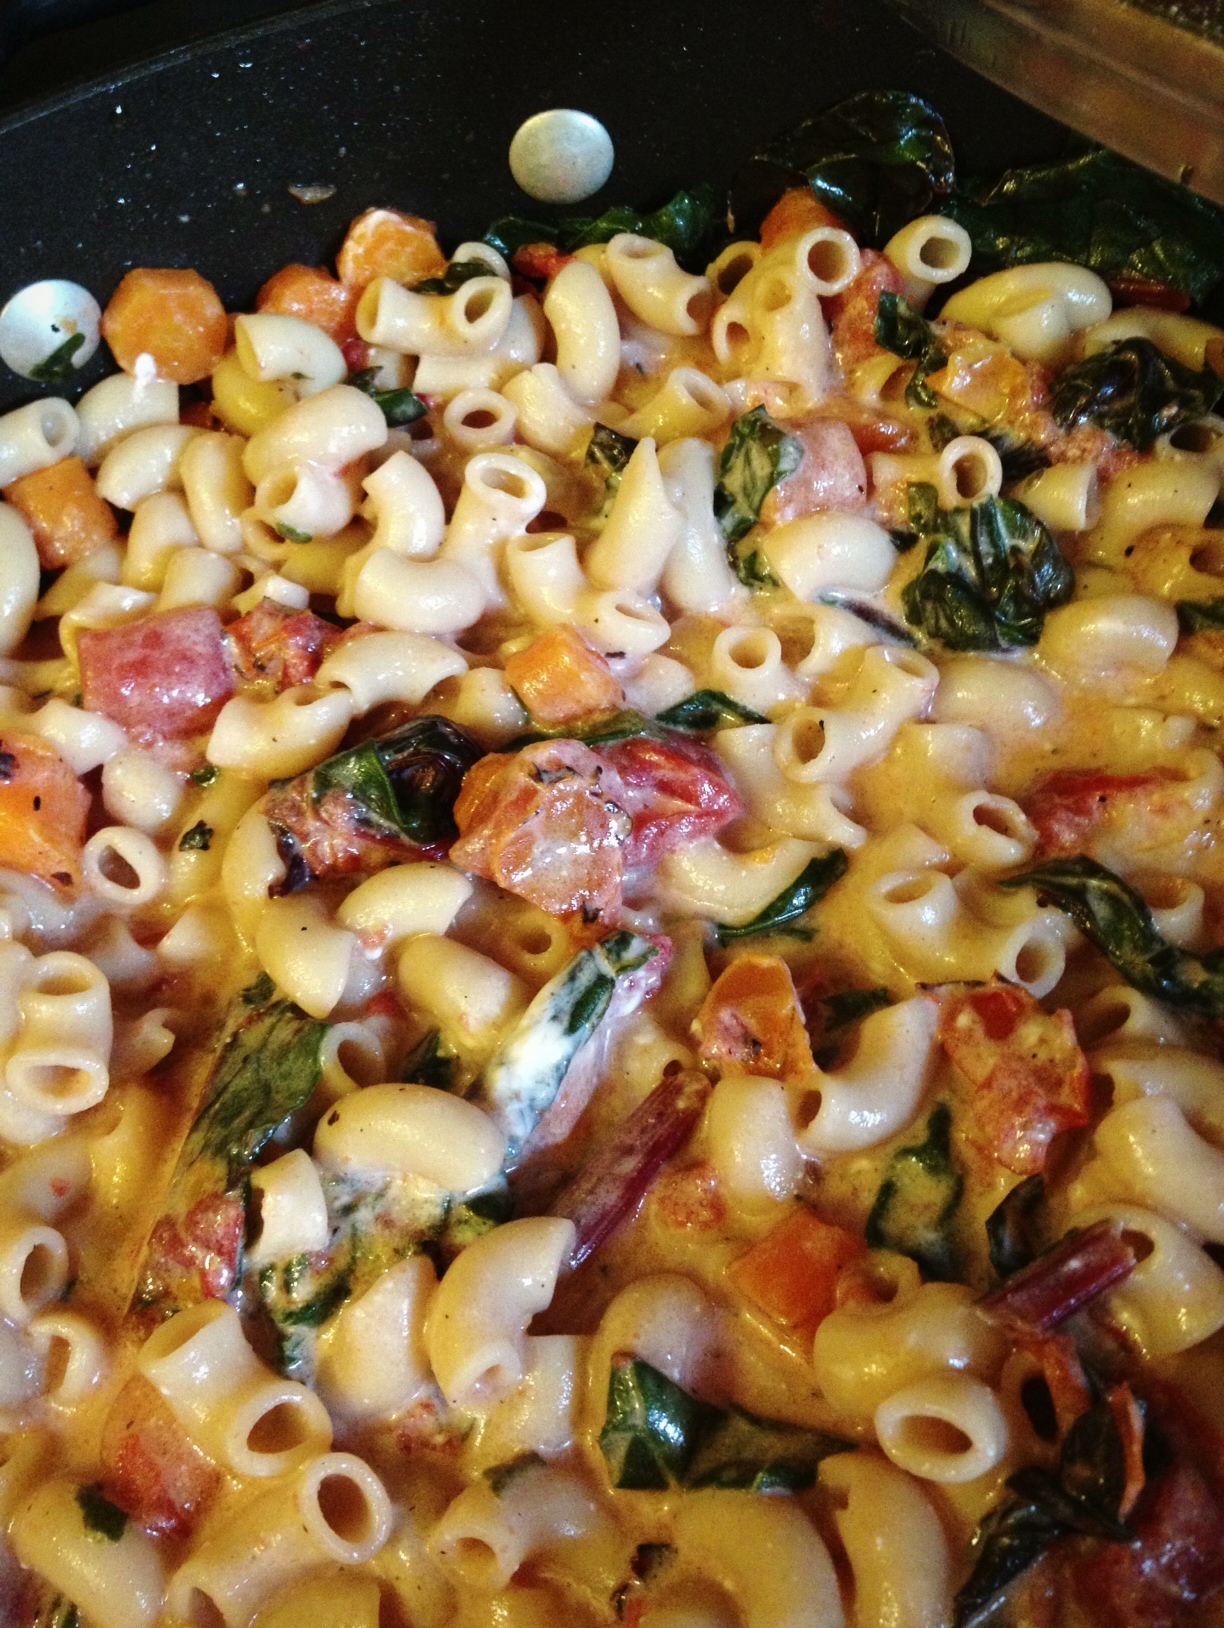
After BBQ Esquire made delicious rack of goat on Easter Sunday, we took the remaining bones and made a broth. Tonight I whipped up a simple pasta dish, and boiled the noodles in the goat broth instead of water. The method added a delicious complexity to very basic pasta. The goat broth added a richness, and a very mild smoky Big Green Egg flavor. This smokiness rendered itself in a flavor profile that piqued the sweet-sensing side of my palate.

So even though our Big Green Egg was not touched tonight, the flavor derived from our BGE cooking had a big influence on this evening’s meal.
Making broth from Big Green Egg proteins
Just about any meat with a bone made on the Big Green Egg will yield a lovely broth with a delicious smokey quality. I’ve run into a few situations where a dish made with a heavy Memphis-style rub will result in an overwhelmingly flavored broth, but aside from those rare occasions, I have had great success with Big Green Egg broths.
Select a pot for your range that fits the the bone from whatever you’ve made, so you can fill the pot with water just covering the bones, leaving at least 2-3 inches of space in the top of the pot. I use a 3.5 quart saucepan with built in spouts for most broths, and it has the added benefit of having a built-in strainer for the broth. But before you add the water, check your kitchen for any vegetables or veggie greens you can toss in. I try to add the tops of carrots whenever I have them on hand. Occasionally if we have greens on hand that are on their last legs, I will toss them in to add flavor, and give a use to a food that would have otherwise been wasted. Fill the pot with water so the bones are just covered.
My method is not an exact science, but I like to bring the broth to a full rolling boil right away, and then when the broth hits a boil, drop the temperature of the range to the lowest simmer. I let it go for about an hour depending on how much content is in the broth – and how much time I have before I want to clean up and close the kitchen for the night.
After I strain the broth, I often freeze it for convenience. I like to have both dark (beef, goat) and light (chicken) broths on hand in my freezer so I can choose the style that works best for my dish when I start cooking.
Recipe Recap
In case you wanted to try the dish I made, I used a very simple list of ingredients:
• goat broth
• pasta
• olive oil
• chard
• carrot
• tomato
• sour cream
Method:
Follow recommended method for cooking your pasta per the package instructions, substituting goat broth for water.
Stir fry carrots in olive oil in a large fry pan. After carrots have begun to brown, add chard. After chard has started to wilt, add tomatoes. Strain pasta and add to to the fry pan. Drizzle some additional olive oil, and stir contents. Add a few scoops of sour cream if you’d like to give the dish a vodka sauce style. Of course this would be even more delicious with a full-fledged vodka sauce, but I am trying to prepare a few dishes a week with minimal ingredients as a healthy challenge. Enjoy!
Fall Grilling
When looking back over my blog this weekend, I realized I started writing this post last year but never finished! Such is life with a little guy running around!
Last fall we had a whole bunch of pumpkin on our hands. We grew two in our garden, we bought one at a pumpkin patch, and we received one in our CSA. That is a ton of pumpkin! Mrs. Esquire and I shared the pumpkin cooking duties; she worked inside and I worked on the Big Green Egg.
After we gutted one of the pumpkins, we separated the seeds and I grilled them with olive oil in my Mexican redware. Quite delicious!

The seeds were merely a warm-up. For the main event, Mrs. Esquire asked me to grill the Big Max pumpkin we grew in our garden. The idea behind grilling the pumpkin was just to soften it up so we could peel it and then cook it more if necessary, to make soup or pie. So I went ahead and tossed the pumpkin on the Big Green Egg.

You might be thinking to yourself – there’s no way that worked! Well, you are kind of right. The lid didn’t close all the way. I decided to grill it for a while anyway. Eventually, the pumpkin softened up a little bit, squished into itself, and the lid fell shut. I thought all was good.
I was wrong.
I pulled the pumpkin awhile later. It grilled up just fine and we peeled away the skin. The next time I fired up my BGE, however, I was greeted with a little surprise – the probe on my BGE thermometer had broken off just inside the grill. I guess it was pressed against the side of the pumpkin as the lid was sitting slightly open, and the weight of the lid just snapped it off. What a bummer!
I was out $30 for a new thermometer but I learned a valuable lesson. Going forward, I will always pay attention to the thermometer probe when I grill something as big as this pumpkin.
Duck Fat Buns
A guest post by Mrs. Esquire
The perfect accompaniment to pulled pork
My husband, BBQ Esquire, has perfected his Big Green Egg pulled pork and Carolina sauce since he first started “egging.” He presides over the grill, and I take control when it comes to baking. So as he honed in on just the right method for his pork, I had to develop the perfect bun to go along with it. We often serve his pulled pork without a bun, or with a simple slice of one of my hearth breads. However, hearth bread is a little overpowering for pulled pork, and I knew a bun or biscuit type product would yield a better result.
While this blog is all about the Big Green Egg, I make these buns in our oven inside to accompany the meat cooked on the BGE. I am certain you could experiment making these on your Egg by trading the baking sheet for a pizza stone, dropping the temperature a few degrees, and extending the bake time a little. We haven’t tried this yet. It would be an ideal situation for a family with more than one Big Green Egg in the backyard!
It starts with a scone
The basic concept for my buns to accompany BBQ Esquire’s pulled pork comes from a family recipe passed down from my grandmother and great aunts. My dad’s family lived as subjects of the British crown, and afternoon and evening tea parties were a part of their family tradition. Families would call on each other, often unplanned. The host would quickly whip up a batch of scones. Starting with this scone recipe means this bun cooks up quickly and easily, with simple ingredients you often have on hand.
But I love to experiment and try new things, so I made some adaptions from my family recipe, creating more of a biscuit and less of a scone. Of course I cut the raisins, I backed out the sugar, and I added a dash of salt. And by substituting all the butter in the recipe with duck fat, this suddenly became the perfect flavor compliment to the Carolina style pulled pork.
The perfect bun for your Big Green Egg pulled pork
Ingredients:
2 1/2 cups flour, plus one additional handful to roll out dough
5 teaspoons baking powder
1 dash of sea salt
1/2 cup duck fat (see next section on sourcing)
1 cup milk
1 egg
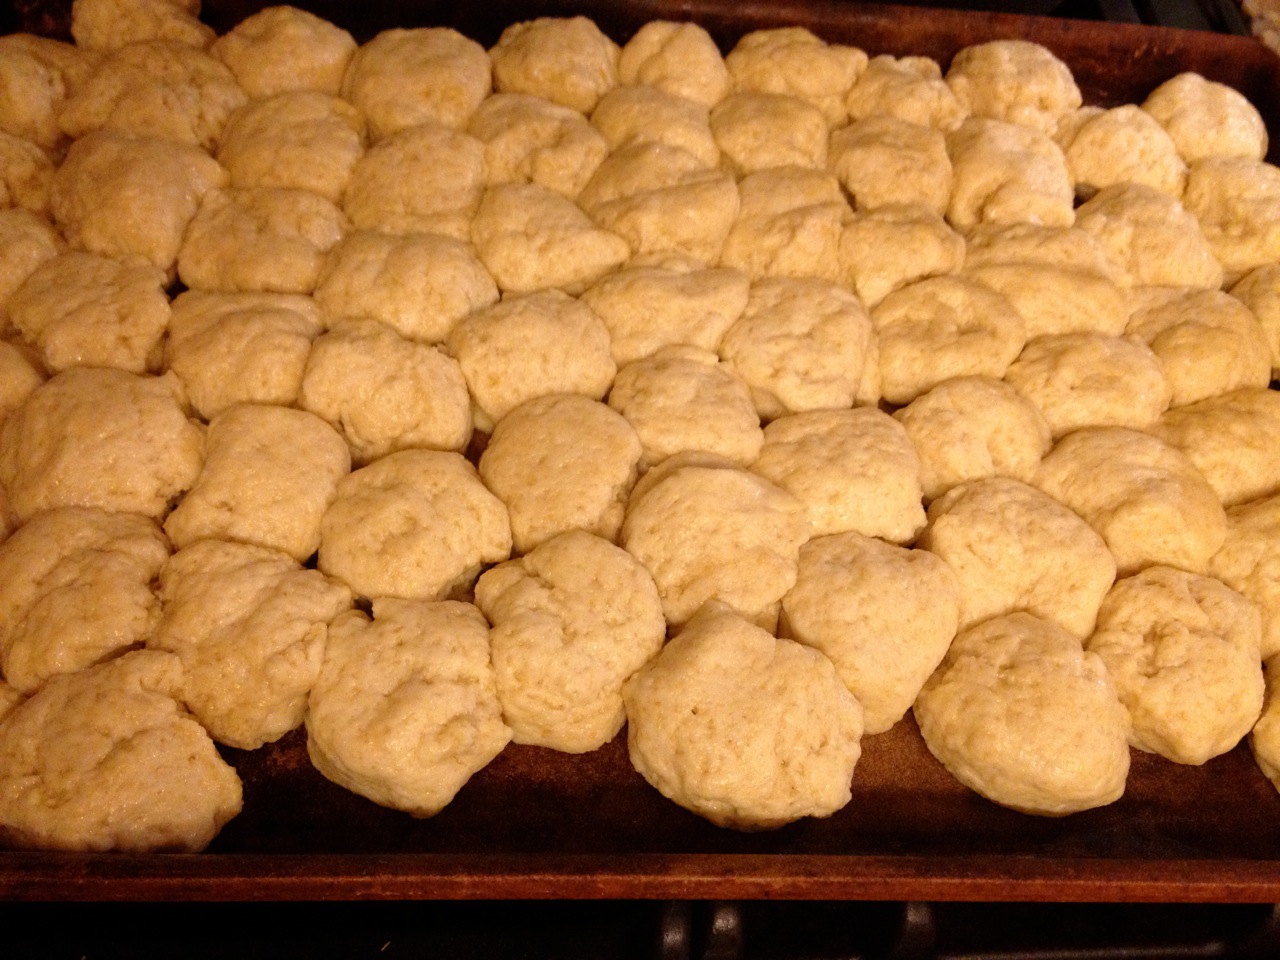
Mix all dry ingredients. Add in milk, fat, and egg and quickly stir by hand until you have worked out most of the lumps. Do not over-stir or your buns will not rise. Roll the dough out and pat it flat to a 1/2 inch or so thick. Sprinkle a handful of flour over the top to make handling easier. Cut out circular buns with a small biscuit cutter or juice glass. Arrange on a stoneware baking pan with edges touching. I no longer have to grease my stoneware pan because it is well seasoned, but consider coating your baking surface with oil, butter, or duck fat if needed. Bake at 400° F for 15 minutes.
Separate the individual buns, and slice them in half horizontally. Fill them up with pulled pork and enjoy.
Did you say duck fat? I thought this was supposed to be simple.
If you do not have access to duck fat, substituting butter will work, though you will sacrifice flavor. You can find duck fat in some specialty grocery stores. I skimmed my own duck fat, and it is not as complicated as it sounds. We occasionally cook whole duck in our slow cooker. After you serve the duck you are left with a lot of juice in the bottom of the cooker. Strain it, and let it cool. The fat will rise to the top. I skim it off and save it in mason jars until I need it for a recipe like this.
We’d love to hear what you think about this. Did you try it with any substitutions? Has anyone tried this in the Big Green Egg? Tell us your experience if you try these out.
Cooking up Kale
A guest post by Mrs. Esquire
My love affair with lacinato kale
I eat a lot of kale. It is one of my favorite foods, especially lacinato kale, which is also known as dinosaur kale. I whip up a stir-fry of kale on my range several times a week, but once in a while when we are making something for dinner on the Big Green Egg, we experiment with a kale side dish.
Grilling with kale
It seems like many folks who grill kale make “chips.” While I love kale chips, my frustration is that a giant bunch of hearty kale turns into a few flakes of kale crisps. I want to keep some of the moisture in the kale to make my dish substantial. For the same reason, I also like to keep the center rib of the kale intact whenever possible.
We have a wonderful piece of red ware that we use like a dutch oven on the BGE. Here, we filled it with a diced fennel bulb, lacinato kale, and olive oil.
BBQ Esquire cooked this creation on the BGE first with the lid of the dutch oven off, to get a stir-fry going. Then he put the lid on to maintain more moisture as it finished cooking.
The fennel is a great flavor combination with the kale, and the Egg adds a delicious smokiness. Sprinkle a little philippine sea salt on the kale before serving to round out the flavor profile of the dish.

Experimenting with Hearth Bread
Hello, BBQ Esquire Community
Allow me to introduce myself: Mrs. Esquire here. My husband, BBQ Esquire, is our family grill master, but I work on the prep side of some of our BGE collaborations. My hands made a cameo on the blog in the Turducken post, and I did the camera work in the Caveman Grilling video. I hope to share my experience with some of our shared BGE creations, most of which involve baking.
Use your Big Green Egg to bake delicious hearth bread
In a small urban town home like ours, outsourcing some of your baking to the backyard can make entertaining easier, and it allows you to use the space in the kitchen for other projects. Skip heating up your oven when your house is already packed with people, and skip piling up bread pans in the sink when you already have a bunch of dishes to do. Hearth bread refers to loaves baked directly in a wood fired oven, or on stoneware. These breads are rustic, freeform, and thick-crusted.
One aside about my baking technique: I love cookbooks and I love recipes. However, most of the time I do not actually follow them. I use recipes, and the gorgeous photos that often accompany them, as a starting point for an idea. I make liberal substitutions, imprecise measurements, and add in my own “flair”. It’s a little like the Swedish Chef from the Muppet Show when I get going in the kitchen. Have you ever seen that guy use a measuring cup?
Many of my creations are one-time-only inventions, and I cannot recreate them. But, I do use certain recipes regularly as my starting off point for a particular dish or item. In the case of hearth bread, I always refer back to a recipe published in Gourmet Magazine in May 2008 for a Georgian cheese bread. I have made this recipe in my oven following the actual method. It makes a delicious bread. But I also use the concept and a rough interpretation of the ingredients to make hearth breads in the Big Green Egg.
The recipe that inspires my BGE creations
Georgian Cheese Bread
Adapted from Natia Gigani
Caucasus Travel Ltd., Republic of Georgia
Ingredients:
- 2 1/4 teaspoons active dry yeast (a 1/4-ounce package)
- 7 tablespoons warm water (105-115°F)
- 1 2/3 cups unbleached all-purpose flour, divided
- 3/4 teaspoon salt
- 1 large egg, lightly beaten
- 1/4 pound Havarti cheese, coarsely grated
- 1/4 pound salted mozzarella, coarsely grated
- 1 teaspoon unsalted butter, melted
Preparation:
Sprinkle yeast over warm water and stir in 1 tablespoon flour. Let stand until creamy, about 5 minutes. (If yeast does not activate, start over with new yeast.) Stir together salt and remaining flour in a large bowl, then stir in egg and yeast mixture to form a dough. Turn out dough onto a well-floured surface and turn to coat with flour, then knead until smooth and elastic, about 5 minutes. Form into a ball and dust with flour. Let dough rest in a bowl, covered with plastic wrap, punching down with a wet fist every hour, at least 2 hours and up to 3.
Preheat oven to 500°F with rack in middle.
Turn out dough onto floured pizza pan, turning to coat, then flatten with your fingers into a 7-inch disk. Toss together cheeses and press into a compact 3-inch ball with your hands. Place ball in middle of dough, then gather dough up around ball of cheese, squeezing excess dough into a topknot. Press down on topknot with a damp fist to press cheese out from center. Continue to flatten dough and distribute cheese evenly, pressing outward from center, until dough is an 11-inch disk. Cut a 6-inch X through top of dough to expose cheese. Bake until pale golden, 10 to 12 minutes. Brush surface of dough with butter and bake until golden and cooked through, 3 to 5 minutes more. Serve cut into wedges.
And now for the change-up
So the recipe I just listed is my inspiration. I make all kinds of adjustments and substations.
For the slice of bread pictured here, I didn’t have nearly enough cheese on hand, so I used what I had, making the cheese more like a little garnish in the center rather than a major flavor contributor as it is in the original recipe. I substituted about 1 cup of whole wheat flour for the all-purpose flour . I substituted tolive oil for butter. Because I had significantly less cheese, BBQ Esquire cooked the loaf lower and slower than the recipe calls for (375°F as opposed to 500°F, at least double the recommended cook time, or until the crust is browning). BBQ Esquire set the grill with the plate setter legs down and the stone set on top of a spacer, such as the little Big Green Egg feet.
This bread won’t win any prizes at the state fair. It was imperfect and strangely shaped, but it was absolutely delicious and fun to bake. It is fun to experiment, so I hope you can use the basics of this Georgian Cheese bread as a starting point for your BGE creations, too.

Stuffed Peppers
The internet is an amazing thing.
I know that’s not a ground breaking statement. But do you ever step back and think about what life used to be like before the internet?
There are so many recipes online! I have a few grilling cookbooks, which I really enjoy and which inspire me. However, I often find myself riding BART home, thinking about how I can use the food I have on hand to create an interesting dish. With my phone and ten minutes of downtime on the train I can put together an idea for dinner. The recipes I find online aren’t always the fanciest, but they are good enough to get me started.
These stuffed peppers were a BART-phone-recipe special. My CSA shipment included these beautiful sweet peppers.

Of course I always have ground beef on hand from the meat CSA. I browned some beef with onion and a collection of seasonings. Then I mixed in salsa, white rice, and soft cheese. I stuffed the peppers then topped them with cheese.

I set the Big Green Egg for indirect grilling and threw on some mesquite chips for smoke. I grilled them at about 350 for 25 minutes or so. Since the meat and rice are already cooked, the goal of grilling is just to soften up the peppers and melt the cheese to a nice, golden brown.

This recipe wasn’t especially quick, with browning the meat, cooking the rice, stuffing the peppers, and then grilling them. However, I was able to work it into a weeknight without too much stress. They were really good, and a fun way to use both the meat and vegetable CSA!
Rosemary Pork Skewers
The other day I was looking for fresh ideas to use some of the ground pork and beef I get every month in my meat CSA. I came across an interesting recipe. I have to confess: I made this dish a few weeks back and I can’t track down the recipe online. So I can’t give you the recipe and I can’t give credit where credit is due. (I know, I shouldn’t quit my day job to start writing about food professionally). All I can give you are some pictures and a basic idea of what I did.
First I mixed some ground pork with some rosemary, an egg, some bread crumbs, and I’m sure some other seasonings. I then formed them on rosemary sprigs which I’d stripped halfway.

I quartered some red onions skewered those with bamboo, and threw them on the grill with a couple of peppers.

A note about the peppers. I used to cut bell peppers into one inch squares and grill them on a skewer. I liked the crispiness and the char. I was always skeptical of roasting bell peppers whole and then skinning them. It seemed like you’d lose the grill flavor. Well, after seeing this preparation method a few different places I decided to give it a try. Of course, I should know better than to doubt those who have been doing this much longer than I have! I’ve been converted.
More about finishing the peppers later. First, I had to put the pork on the grill.

I figured the rosemary would burn, but I also figured that would simply add aroma to the cook. If I were concerned about presentation I could re-skewer the pork at the end.
I grilled the skewers basically the same way you would a hamburger, flipping intermittently and pulling them after about 8-10 minutes. You can see that some of the rosemary skewers survived better than others. I also prepared a greek yogurt and olive oil dressing for the pork (sorry, no recipe for you!).

Here are the peppers when I pulled them from the grill.

After allowing the peppers to cool, I skinned them, sliced them open, and scraped out the seeks and membranes. Then I sliced them into short strips.

They were delicious! So moist, yet with that smokey, roasted flavor. I’m a big fan. Together with the pork and greek yogurt, this made a nice little meal! As always, thanks for reading!
Double Level Grilling
Just a quick post to share a photo. The other day I tried some double level grilling in my Mexican redware.

Those are mushrooms and onions on the top (for hamburgers) and potatoes and onions on the bottom. My raised grill has hinged sides, allowing me to flip up half of the grill to reach the food underneath. When it was time to stir the veggies I shuffled the top deck, flipped up half the raised grill, stirred the potatoes, then shuffled the top deck to the other side and stirred the other batch of potatoes. It was pretty slick.
One takeaway from this – I was surprised at how much the restricted air flow reduced my temperature. I’ve loaded down the grill with pork butts and brisket without noticing a difference. I guess the reduced airflow has a bigger effect at higher temperatures. This makes sense. I just have to crank it up when I do this in the future.
ABTs
I’d never heard of ABTs until I started reading barbecue blogs. Soon it became apparent to me that this appetizer is a staple of the barbecue pastime. How had I made it to the ripe old age of 33 without ever eating ABTs? I guess I’ve been running with the wrong crowd.
What are ABTs, you ask? Well, the full name is Atomic Buffalo Turds. I’m not allowed to call them that, however. Mrs. Esquire believes you shouldn’t serve your guests a “turd.” She’s probably right about that. Plus, we’re entering 18 years of “we don’t say that word in our house.” We haven’t drafted the list of “bad words” yet, but using “turd” to refer to food probably won’t fly.
Mrs. Esquire and I went back and forth about what I should call my ABTs. She said I should come up with a new name. I disagreed. You can’t serve a hamburger and call it a ground beef sandwich. It’s hamburger, plain and simple. When I serve ABTs, I don’t want to pretend like I invented the dish. Or, worse yet, I don’t want to serve them to someone in the know and get called out on my fake name. In the end, we settled on a compromise. I can call them ABTs, but if anyone asks, I have to say they’re Atomic Buffalo Tidbits. That’s good enough for me.
So you’re still probably wondering – what are these turd/tidbits? The basic recipe is fairly simple: half a jalapeno, filled with cream cheese, sometimes topped with some sort of meat, and wrapped in bacon. The traditional recipe calls for a Lil’ Smokie on top of the cream cheese.
I didn’t want to use Lit’l Smokies in my ABTs. I’ll admit, Mrs. Esquire and I have become food snobs since we moved to San Francisco. In my days growing up in Minnesota I ate many a hotdish, the central ingredient of which was usually Cream of Mushroom Soup. Now, Mrs. Esquire and I have a philosophy: prepackaged food is not an ingredient. I just couldn’t bring myself to put Lit’l Smokies on my ABTs.
I decided to buy a chorizo sausage instead of Lit’l Smokies . I didn’t know exactly how I was going to use it. I was thinking of cooking the chorizo and laying it in slices across the top of the jalapeno. Then I figured I should see if others have used chorizo. Sure enough, the often-inspiring Griffin’s Grub recently posted a recipe for ABTs with chorizo. I followed his technique.
I split open the chorizo sausage, browned the meat, and mixed it in with some neufchatel cheese (you can use cream cheese if you want).

I sliced each jalapeno in two and scraped out the seeds and the membrane. I then filled each one with the cheese-chorizo mixture. I had a few extra crumbs of chorizo, which I placed on a top of a couple of peppers.

Lastly, I wrapped each jalapeno with some bacon. I used between 1/3 and 2/3 of a slice of bacon on each, with 2/3 being too much, 1/3 being too little, and 1/2 being just about right. I used pepper bacon from Whole Foods, which I think added a nice kick to the finished product. I also dusted them with a barbecue rub. I placed them on a 300 degree Big Green Egg, set for indirect cooking (plate setter legs up), with some hickory chips for smoke.

My company arrived while the ABTs were on the grill. Consequently I didn’t watch the grill as closely as I should have. My temperature ranged from 275 to 350. I kept the ABTs on the BGE for about an hour. There’s no real science to the cooking time or temperature. I think they should be cooked low enough to impart some smoke and long enough for the bacon to crisp. Here’s the final product.

I have to admit, they were way better than I thought they were going to be. Three of us dusted off almost that entire plate. These will definitely become part of the rotation! If I do them for a bigger group I will probably use my raised grill rack so I can cook more. As always, thanks for reading!
My First Brisket
Memorial Day weekend I earned a long overdue notch in my barbeque belt. I smoked my first real brisket. I say first “real” brisket because awhile back I smoked a little hunk of brisket I picked up at the Marin Sun Farms butcher. This time, though, I went all out. I followed my rule of working with the whole cut of meat so I can learn what I’m doing. I invited some folks over. I even read up on authentic Texas sides and added those to the party.
All food arises from culture and tradition, but barbeque is almost culture first and food second. People across the south are exceedingly territorial about their barbeque. But that is not to say that barbeque must be divisive. Even a good Memphian would eat some vinegar-sauced pork when invited to a Carolinian’s backyard. At its core, barbeque is about slowing down, taking your time, and spending time with others. That’s true no matter what kind of sauce you use.
I wanted to capture both of these cultural features of barbeque – the socialization and the regional preferences – in my first brisket cook. I accomplished the first by invited a few guys over to hang in the backyard. Friend attendance was also necessary because of my first rule of learning barbeque (cook the entire cut). I tried to respect regional preferences by building my whole menu from a great texas barbeque website: http://amazingribs.com/. I prepared beans and potato salad from the recipes on that website.
I won’t get too much into my brisket process / recipes here, because I’m just a rookie finding my way. I did have some interesting challenges to overcome, though. First, a full packer brisket (in other words, the whole cut) is a pretty big hunk of meat. It was too big for my Big Green Egg.

I overcame this obstacle by attempting to separate the flat from the point prior to cooking. (I’m not going to define all these terms here. You can read the technical stuff on www.amazingribs.com). I know I ended up with at least some flat in my point, but I had a really hard time making this cut. My piece of meat looked different than the pictures online!

With these two more manageable chunks ready to go, I gave the brisket a little trim and was ready to start with the rub. I rubbed down the meat late Saturday night.

After rubbing I wrapped the meat back up and put it in the refrigerator. I pulled it out again Sunday night to give it a simple injection of beef broth and a little more rub.
At last, the long-awaited hour arrived. It was time to start smoking! Here we are, all ready to go, with my temperature probes placed, my drip pans of beef broth and apple cider vinegar, and my hickory chips.

A note about the wood chips: I’m changing my strategy here. I used to soak them and put them on top of the coals right before placing the meat. I think both are bad ideas. I confirmed through a little reading on the BGE forum that there’s no real reason to soak the chips for use in the BGE. They won’t flame in the low-oxygen environment of the BGE. I think placing the soaked chips on top of a fragile, low temperature fire has been giving me problems in the beginning of the cook. For this cook, I ended up babying my fire long into the night. (Speaking of “baby,” having an infant is great training for tending a finicky fire all night long.)
Here we are, meat on at 10:30 p.m., ready to go to bed for the night. To be clear – as noted above, the meat went to bed, but I stayed up for hours.

I should have let myself relax. As it was, I built in plenty of time and my meat ended up finishing way early. I allowed for a 17 hour cook. The point reached 200 degrees in about 10 hours. Woah! The flat finished in 13. Luckily I was well equipped with heavy-duty aluminum foil, blankets, and a cooler, to keep those guys warm.
I was petrified of ending up with beef jerky. Everything I read about brisket talked about how difficult it is and how it can easily dry out. I feel I overcompensated with the drip pan, the thick fat layer, and the natural humidity of San Francisco. Look at that pool of juice!

Before the guests arrived I pulled the point out to make burnt ends. I sliced the meat into chunks and put the chunks in an aluminum foil pan with some fat (which I had reserved in the refrigerator) and some extra rub. I lost track of how long I cooked them. I’ll pull them a little sooner next time, though, as I they were a little heavy on the “burnt!”

After I pulled the burnt ends I threw the flat back on the grill for about five minutes a side, at 400. I wanted to firm up the crust a bit and give it a nice shot of heat before I served it. After I pulled the meat, it was finally time to slice!

My beef jerky worries were quite misplaced. Between the moist San Francisco night air, the thick fat cap, the injection, and the drip pans, I probably overcompensated on the moisture. I might try it without the drip pans next time. But when you have people coming over and it’s your first time, the last thing you want is dried out meat! I really enjoyed the final product, and I think others did too. We had a great evening hanging out in the backyard.
I’ll end this post where I stared: waxing philosophical on the culture of barbeque. I enjoy watching the show BBQ Pitmasters, which runs during the summers on some random cable channel. I’ve learned a ton from the show. However, I’ve begun to notice a difference between the “competition barbeque” techniques used on the show and the “backyard barbeque” techniques I read about online. For one, the cook times are much shorter on the professional circuit. That probably has something to do with practicalities of running a restaurant (where these Pitmasters hone their trade) and the time constraints of barbeque competition. As a result of the shorter cook time, and the need to differentiate your product, competition barbeque is much more complicated. These cooks are constantly mopping, saucing, wrapping in aluminum foil, and glazing. It’s not easy!
I decided tonight that’s not my endgame. I’m never going to be a competition cook. I’m never going to open a barbeque restaurant. I enjoy learning new skills, practicing a craft, relaxing in the backyard, and enjoying good food with friends. If I can keep from taking myself too seriously, I will have a lifelong hobby I can enjoy with friends and family. So I’ll keep watching my barbeque shows with an evening beer, but I’m not going to take notes. And I’ll keep working on my techniques, but I’ll always make sure I enjoy what I’m doing. Most of all, I’ll keep cooking because I enjoy it and because I enjoy sharing it with friends. Here’s to barbeque!
