Not a Plain Old Burger
My meat CSA is a common theme on this blog, and logically so, I suppose. With the CSA sending me 10 pounds of meat a month, I only venture outside of the ready supply in my freezer for special occasions. Most of the time, I’m grilling up some CSA meat.
With all the ink I’ve spilled on my CSA, however, I haven’t spent much time talking about the ground meat. That changes now. Because the ground meat in my CSA is some of the best I’ve ever tasted. The beef is a 75/25 blend. Pretty rich stuff! It is awesome for burgers.
In my quest to explore the outer reaches of barbeque, the burger could be easily forgotten. This should not happen. Burgers are a staple of American outdoor cooking. When prepared well, they are delicious. This weekend I skipped the goat and grilled some burgers.
Even with burgers, though, I must explore. I often go with a mushroom, onion and swiss burger. I grill the mushrooms and onions in my redware before I grill the burgers, and place them on the burgers, topped with cheese, for the last minute or two of the cook. This weekend, for my first burger cook, I experimented with cheddar and jalapeño.

I prepare my beef with Worcestershire sauce, salt, pepper, garlic salt, and a little cayenne. After I form the patties, I always make a little divot in the middle. This keeps the burgers from fattening up into a ball as they cook. Although I am an avid flipper of steaks, I usually don’t flip my burgers that often. I’ve read in quite a few different places that over-flipping burgers causes them to lose juice, and I tend to agree.
Prior to putting these burgers on the grill I roasted one jalapeño over direct heat until the skin charred on all sides. I allowed the jalapeño to cool a bit, then I skinned it, seeded it, and diced it.
Then I threw the burgers on the grill. I usually go about four minutes on the first side before flipping. I then grill them for another 3 minutes or so, or until the burgers are almost done, before removing them from the heat. I learned this trick with my mushroom and swiss burgers. If you try to dress a grill full of burgers while they are over the flame, your burgers and your hands will end up overcooked. For this cook I plated my burgers, covered them with jalapeños and cheddar cheese, and then put them back on the grill to cook until the cheese melted. Sorry, no picture of the finished product, but they were good!
For my second burger cook of the weekend, I made lamb burgers. I found this recipe on my All Recipes app. As you can see if you follow the link (I’m not going to rehash the entire recipe here), the recipe calls for quite a bit of green stuff – oregano, mint, and cilantro. It would be an expensive recipe if you bought a $4.99 bunch of each at Whole Foods. We happen to have oregano and mint in our garden (the cilantro is coming along) and affordable organic cilantro at the corner bodega, so it wasn’t too bad. I was excited to use a pound of CSA ground lamb.

These lamb burgers were also delicious! I was surprised that the mint, oregano and cilantro were not overpowering. The ground cumin was quite forceful (which I liked), and the red pepper flakes added some subtle heat. We will definitely use this recipe again.
You can see that one burger is smaller than the rest. It was for the little guy. As I reflected on this weekend of burger grilling, I decided that burgers need to be a big part of the rotation as we raise our family. Mrs. Esquire likes them (if they are made with delicious CSA meat), they are relatively affordable, and I can experiment with tastes like jalapeño cheddar and spicy lamb burgers. These recipes are both keepers!
Rack of Goat Lives On
A guest post by Mrs. Esquire
The Big Green Egg influences our meals even when we don’t fire it up
It’s a busy weeknight. While we love grilling on our Big Green Egg for any meal, there are nights when we’re pressed for time, and throwing something together on the range is all we have the capacity to do. But even on these occasions, there are ways that our Big Green Egg can continue to influence and flavor our meals.
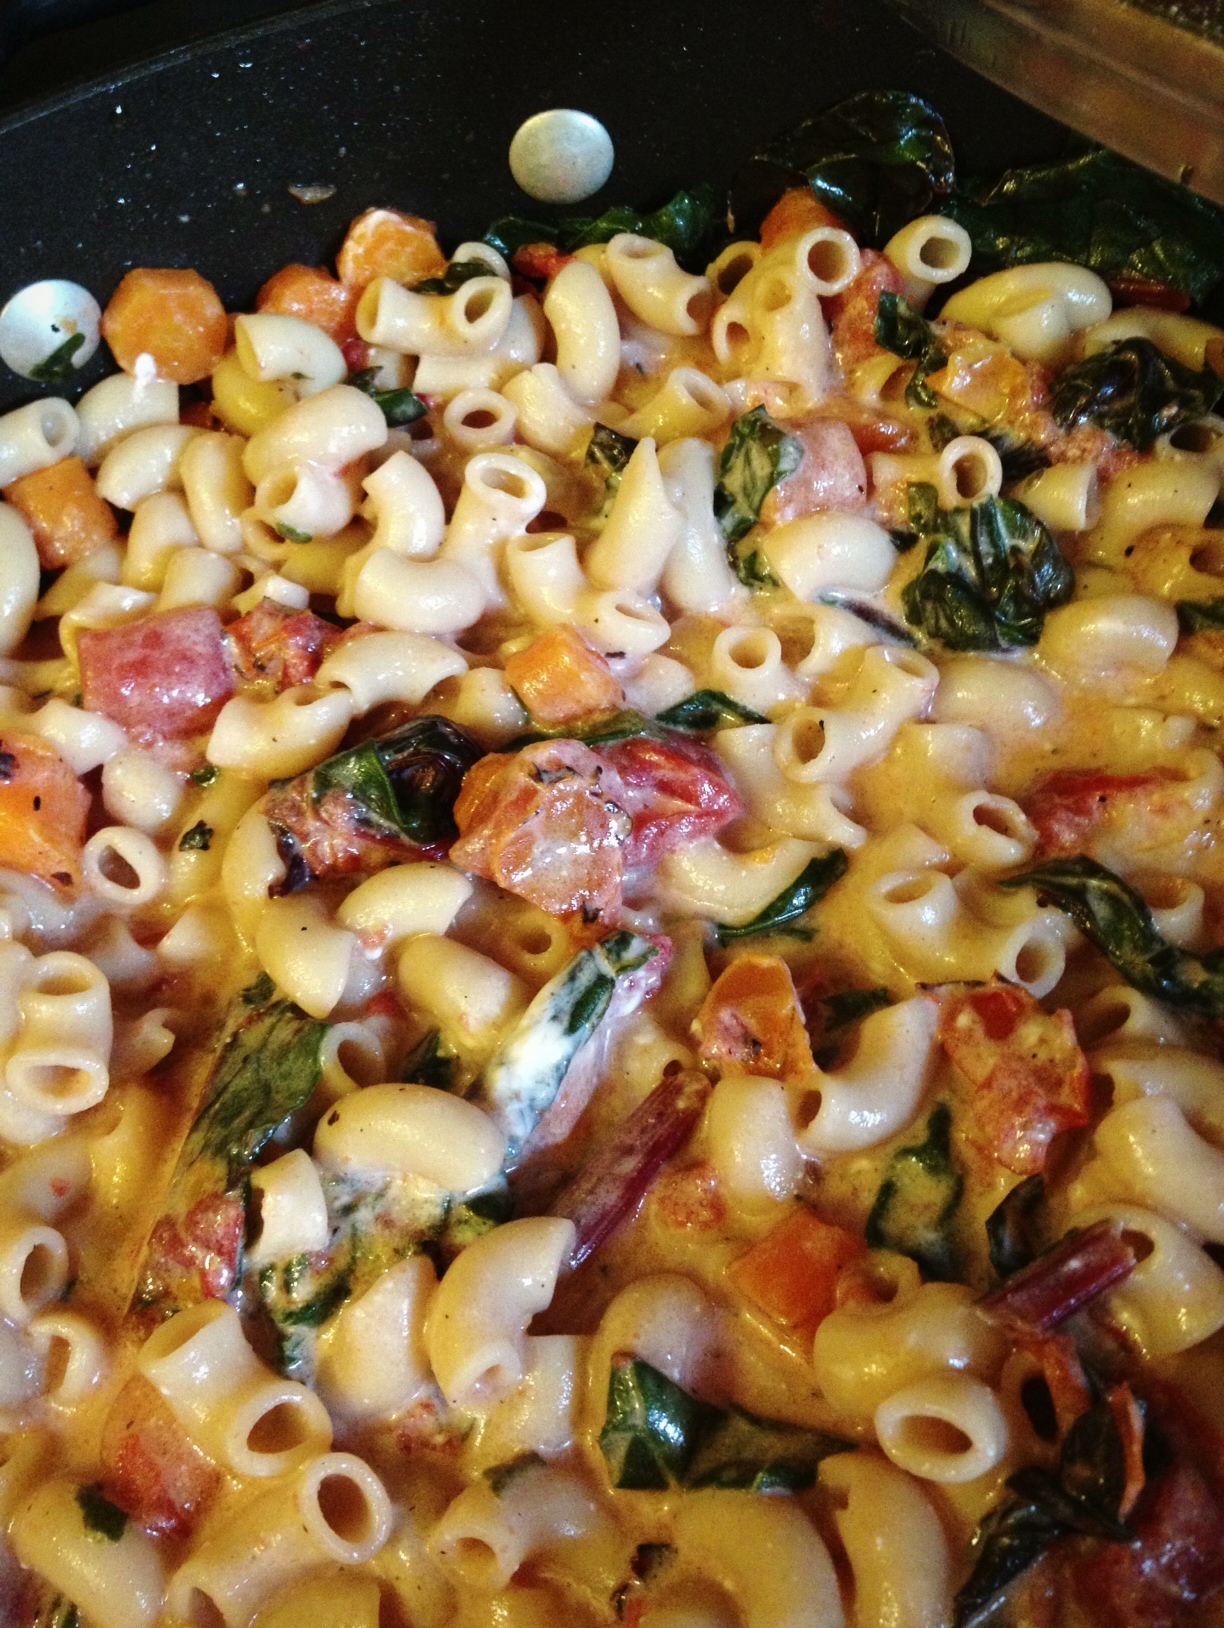
After BBQ Esquire made delicious rack of goat on Easter Sunday, we took the remaining bones and made a broth. Tonight I whipped up a simple pasta dish, and boiled the noodles in the goat broth instead of water. The method added a delicious complexity to very basic pasta. The goat broth added a richness, and a very mild smoky Big Green Egg flavor. This smokiness rendered itself in a flavor profile that piqued the sweet-sensing side of my palate.

So even though our Big Green Egg was not touched tonight, the flavor derived from our BGE cooking had a big influence on this evening’s meal.
Making broth from Big Green Egg proteins
Just about any meat with a bone made on the Big Green Egg will yield a lovely broth with a delicious smokey quality. I’ve run into a few situations where a dish made with a heavy Memphis-style rub will result in an overwhelmingly flavored broth, but aside from those rare occasions, I have had great success with Big Green Egg broths.
Select a pot for your range that fits the the bone from whatever you’ve made, so you can fill the pot with water just covering the bones, leaving at least 2-3 inches of space in the top of the pot. I use a 3.5 quart saucepan with built in spouts for most broths, and it has the added benefit of having a built-in strainer for the broth. But before you add the water, check your kitchen for any vegetables or veggie greens you can toss in. I try to add the tops of carrots whenever I have them on hand. Occasionally if we have greens on hand that are on their last legs, I will toss them in to add flavor, and give a use to a food that would have otherwise been wasted. Fill the pot with water so the bones are just covered.
My method is not an exact science, but I like to bring the broth to a full rolling boil right away, and then when the broth hits a boil, drop the temperature of the range to the lowest simmer. I let it go for about an hour depending on how much content is in the broth – and how much time I have before I want to clean up and close the kitchen for the night.
After I strain the broth, I often freeze it for convenience. I like to have both dark (beef, goat) and light (chicken) broths on hand in my freezer so I can choose the style that works best for my dish when I start cooking.
Recipe Recap
In case you wanted to try the dish I made, I used a very simple list of ingredients:
• goat broth
• pasta
• olive oil
• chard
• carrot
• tomato
• sour cream
Method:
Follow recommended method for cooking your pasta per the package instructions, substituting goat broth for water.
Stir fry carrots in olive oil in a large fry pan. After carrots have begun to brown, add chard. After chard has started to wilt, add tomatoes. Strain pasta and add to to the fry pan. Drizzle some additional olive oil, and stir contents. Add a few scoops of sour cream if you’d like to give the dish a vodka sauce style. Of course this would be even more delicious with a full-fledged vodka sauce, but I am trying to prepare a few dishes a week with minimal ingredients as a healthy challenge. Enjoy!
Rack of Goat
I have a love-hate relationship with my meat CSA. I hate the lack of variety in some of the shipments. I have about 6 pounds of sirloin and flank steak in my freezer right now. My CSA divides cuts into three categories – ground, roast, and steak – with “steak” cuts being the high-end cuts from each species. Sirloin and flank are considered “steak” cuts, but they are a far cry from a bone-in Rib Eye or dry aged New York Strip. I have a hard time using the lower end steak cuts and am always a little disappointed when they show up in my box.
Despite this frustration, I love that my CSA forces me to try new things. Case in point: the two racks of goat I grilled up for Easter dinner.
The pre-CSA BBQ Esquire would never buy rack-of-anything, much less rack of goat. The rack is an incredibly expensive, and frankly, incredibly inefficient cut of meat. You pay $20-$30 per pound, and you’re getting mostly bone! I know I would never walk up to a meat counter and chose this cut. But when I opened my meat box and saw two goat racks, I got a little giddy. I decided they would be perfect for Easter dinner.
My racks did not come frenched (i.e., with the meat and fat trimmed from the bones on the skinny side of the rack). I planned to french them myself, but when I saw the tiny little racks, I just couldn’t bring myself to cut any extra meat away. Again, I guess this was my cheap nature coming through.
I marinated the racks in a simple marinade of olive oil, garlic, thyme, and rosemary. I’ve learned that a marinade usually has an acidic element, such as citrus, to break down the meat fibers and tenderize the meat. I was a little worried that this recipe had only fat, no acid. After a little hemming and hawing I decided to go with it anyway, since my CSA goat is usually plenty tender.
I set up my Big Green Egg for direct grilling, at about 450 degrees. After removing the racks from the marinade I seasoned them with salt, pepper, garlic salt, and a little cayenne. I started with the rack meat side down for a 5 minute sear. I then flipped them and cooked them for about 10 minutes longer.

After about 15 minutes on the grill (total), I started checking temperature with my thermapen. I ended up pulling them after about 20 minutes total, when they were at about 140 degrees.

I ended up with a nice little sear on the top rack. The meat also pulled away from the bone nicely.

The goat was delicious! The marinade retreated to the background and didn’t add much to the flavor profile, but the goat itself was so mildly delicious anything else might have been overpowering. The three chops pictured above were taken from the leaner rack, which didn’t have much of a fat cap. Honestly, the cap on the other rack made those chops a little cumbersome to eat. Next time I attempt rack of lamb or goat, I will go ahead and french the rack. I’ll just have to figure out some way to use the fat and meat I remove.
It was a beautiful Easter, and Mrs. Esquire and I ate like Kings and Queens with our two racks of goat. I guess that really is the point of the CSA experience. You won’t always get a box full of goat racks and bone-in Rib Eyes. Sometimes, life gives you a flank steak. But if you never eat flank steak and only eat rack of goat, the rack of goat will become ordinary. I’ll try to remember this as I’m eating my way through the rest of the meat in my freezer.
Turducken
My Big Green Egg has provided the motivation and opportunity to tackle some pretty big barbeque challenges. Some of my favorites include pulled pork, brisket, and smoked salmon. This holiday season, however, a new favorite rose to the top of the list.
Turducken.
Turducken was definitely a “bucket list” barbeque challenge. My life as a Big Green Egger would feel incomplete if I never made a turducken. I had so much fun learning about turducken, making the turducken, and then, of course, eating the turducken!
The turducken is the ultimate in barbecued poultry. It’s a turkey stuffed with a chicken and a duck. You can purchase an assembled turducken – especially if you live in Louisiana or other parts of the South – but in my mind the assembly is part of the experience.
That said, there are limits to what I can and will do. The first step in building a turducken is to debone a whole chicken and a whole duck. If you are truly ambitious you can do this yourself and can find instructions on how to do so on YouTube. I chose to delegate this task to my butcher. You will also need to remove all the bones from the turkey, except for the leg and wing bones. I also had my butcher do this for me.
In addition to your deboned birds, you will need stuffing. Mrs. Esquire put together the stuffing for me. It was made from chicken sausage and various types of breads. One tip I read online – make sure your stuffing is moist. Dry stuffing will impede the transfer of heat between the birds.
Lastly, you’ll need a rub. I used Emeril’s Essence. Once you have your birds, stuffing and rub, you are ready to assemble.

I have to pause here for a quick confession. Despite the fact that I ordered my meat a month in advance, the butcher didn’t have a whole duck. Frustrating! So instead I used duck breasts.
The first step in assembly is to rub down the chicken and duck, and to put some rub on the inside of the turkey. Next, you put a layer of stuffing in the turkey. You can see that the skin on top of the turkey is intact. I was considering cutting the turkey all the way open, but I’m glad I didn’t. That skin was very helpful in keeping the bird together while I stuffed it.
I wanted my duck in the middle. Since my bird is laying breast down, I put the duck in next. After the duck is another layer of stuffing, then it’s time for the chicken. Lastly, you should fill all the crevices with stuffing.
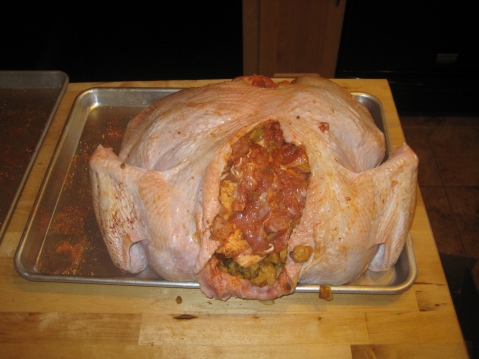
Here’s the bird, fully stuffed.
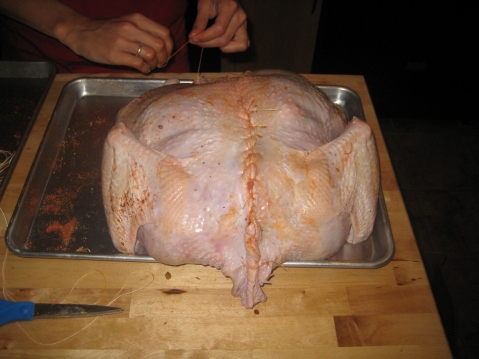
The next step is to perform a little reconstructive surgery on the turducken. Mrs. Esquire helped me with this step – she’s very handy with a sewing needle. We used cotton string to sew the bird back up and truss the legs.
Lastly, I mixed some Emeril’s Essence with margarine (we had kosher guests). I rubbed the margarine between the skin and the breast, and also over the top of the bird. I allowed the bird to come to room temperature prior to the cook, but also iced down the turkey breasts with bags of ice as it was sitting out. I picked up this tip online – the hope is to keep the breasts a little cooler than the rest of the bird so they won’t cook too fast.
It was quite a bit of prep work, but I truly believe it was worth it. Cooking a turducken is a little complicated, and it helped to know the many layers of my bird as I was monitoring the cooking process.
There’s a wide variety of turducken cooking times and temperatures floating around the internet. I decided on 300 degrees, Big Green Egg set for indirect cooking, with a little cherry wood for smoke. I was guessing I’d have a 5-7 hour cook. A good drip pan is also essential. I used a double-drip pan method (with one drip pan on to the grill and two more below the grill, on the plate setter) in hopes of getting some early drippings for gravy.

It’s go time!
In preparation for this cook I bought myself a thermapen instant-read thermometer. I now have quite the collection of thermometers. Some serve different purposes and some I just don’t like. The thermapen is a top of the line instant-read thermometer. I wanted it for this cook because I needed to quickly check the temperature at various parts of the bird without leaving the lid open too long.
The thermapen worked great, but it told me that my bird was cooking much more quickly than I wanted! The turkey breasts were climbing faster than the interior of the bird (as expected) and were inching close to 160 after three hours. The interior still had a ways to go.
At this point I knew I would have to pull the bird at least two hours before we were ready to eat it. I decided to use the old barbecue trick of putting it in a cooler, wrapped in foil and blankets, to rest. Not ideal but I hoped it would work. After about four hours, the interior was up over 150. Counting on significant temperature rise during the two hours in the cooler, I pulled the bird at that point.
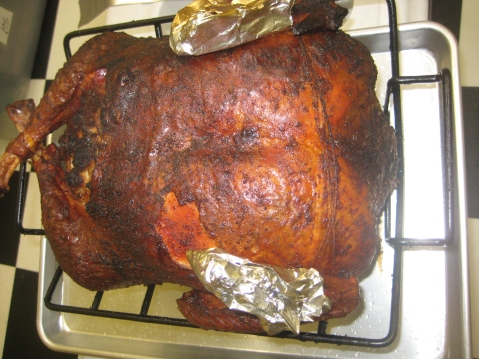
Ready for the cooler! (Oh, by the way, did I mention that I was doing this all in a massive rain storm? Not ideal!)
When I opened the cooler two hours later, a huge gush of steam rushed out. In retrospect, I should have pulled the bird from the cooler about 15-30 minutes before carving it. I didn’t re-check the temperature (too busy!) but I’m sure the breasts were much warmer than I would have liked.
Carving a turucken is tons of fun. Since there are hardly any bones, you can just go at it like a meatloaf. When I sliced into my turducken, I was greeted with this beautiful sight.

The turducken was a huge hit. Even though my temperature got a little higher than I wanted, and even though I had to pull the bird early, it still was moist enough. I would have liked to try it after a more normal resting period. The turkey was, predictably, drier than the other meats. But when you swished the turducken all together on your plate it was pretty darn good. I’ll definitely make turducken again!
As always, thanks for reading!
Stuffed Peppers
The internet is an amazing thing.
I know that’s not a ground breaking statement. But do you ever step back and think about what life used to be like before the internet?
There are so many recipes online! I have a few grilling cookbooks, which I really enjoy and which inspire me. However, I often find myself riding BART home, thinking about how I can use the food I have on hand to create an interesting dish. With my phone and ten minutes of downtime on the train I can put together an idea for dinner. The recipes I find online aren’t always the fanciest, but they are good enough to get me started.
These stuffed peppers were a BART-phone-recipe special. My CSA shipment included these beautiful sweet peppers.

Of course I always have ground beef on hand from the meat CSA. I browned some beef with onion and a collection of seasonings. Then I mixed in salsa, white rice, and soft cheese. I stuffed the peppers then topped them with cheese.

I set the Big Green Egg for indirect grilling and threw on some mesquite chips for smoke. I grilled them at about 350 for 25 minutes or so. Since the meat and rice are already cooked, the goal of grilling is just to soften up the peppers and melt the cheese to a nice, golden brown.

This recipe wasn’t especially quick, with browning the meat, cooking the rice, stuffing the peppers, and then grilling them. However, I was able to work it into a weeknight without too much stress. They were really good, and a fun way to use both the meat and vegetable CSA!
Caveman Grilling
My mother-in-law bought me a great grilling cookbook for my birthday: Charred and Scruffed, by Adam Perry Lang. The author has a unique take on grilling with lots of interesting ideas and techniques. I’m not going to delve into deep detail on this blog when I use his recipes and techniques. If you’re interested in learning more, buy his book!
When I first opened the book, I was immediately drawn to a technique he called “clinching.” The author grills meat directly on the coals! How barbaric! How exciting!
I had to try this right away. I used New York Strip steaks at the recipe’s suggestion. I had two steaks to cook but I decided not to cook them both at the same time. In case of utter failure, I didn’t want to go home hungry.
I was so excited about this process, Mrs. Esquire came out to watch. Spectator grilling! The first steak worked out great. Mrs. Esquire then had the great idea to start filming the action. I was reluctant at first, but the video ended up being pretty interesting.
Now bear in mind, I didn’t start this cook with the intention of putting out a video. I would have done a little more explaining along the way if I’d been thinking about it. I also would have spent a little more time in hair and makeup. But I invite you into my backyard as I “clinch” my second New York Strip Steak. Video Here.
Here’s a photo of the steak down in the coals.

This was really a fun technique. The steaks tasted great, too! Chef Lang is a little heavy on the salt for my palate, so I’ll adjust that going forward, but the steaks had a really nice charcoal flavor. I can’t wait to play with more of his techniques!

Rosemary Pork Skewers
The other day I was looking for fresh ideas to use some of the ground pork and beef I get every month in my meat CSA. I came across an interesting recipe. I have to confess: I made this dish a few weeks back and I can’t track down the recipe online. So I can’t give you the recipe and I can’t give credit where credit is due. (I know, I shouldn’t quit my day job to start writing about food professionally). All I can give you are some pictures and a basic idea of what I did.
First I mixed some ground pork with some rosemary, an egg, some bread crumbs, and I’m sure some other seasonings. I then formed them on rosemary sprigs which I’d stripped halfway.

I quartered some red onions skewered those with bamboo, and threw them on the grill with a couple of peppers.

A note about the peppers. I used to cut bell peppers into one inch squares and grill them on a skewer. I liked the crispiness and the char. I was always skeptical of roasting bell peppers whole and then skinning them. It seemed like you’d lose the grill flavor. Well, after seeing this preparation method a few different places I decided to give it a try. Of course, I should know better than to doubt those who have been doing this much longer than I have! I’ve been converted.
More about finishing the peppers later. First, I had to put the pork on the grill.

I figured the rosemary would burn, but I also figured that would simply add aroma to the cook. If I were concerned about presentation I could re-skewer the pork at the end.
I grilled the skewers basically the same way you would a hamburger, flipping intermittently and pulling them after about 8-10 minutes. You can see that some of the rosemary skewers survived better than others. I also prepared a greek yogurt and olive oil dressing for the pork (sorry, no recipe for you!).

Here are the peppers when I pulled them from the grill.

After allowing the peppers to cool, I skinned them, sliced them open, and scraped out the seeks and membranes. Then I sliced them into short strips.

They were delicious! So moist, yet with that smokey, roasted flavor. I’m a big fan. Together with the pork and greek yogurt, this made a nice little meal! As always, thanks for reading!
ABTs
I’d never heard of ABTs until I started reading barbecue blogs. Soon it became apparent to me that this appetizer is a staple of the barbecue pastime. How had I made it to the ripe old age of 33 without ever eating ABTs? I guess I’ve been running with the wrong crowd.
What are ABTs, you ask? Well, the full name is Atomic Buffalo Turds. I’m not allowed to call them that, however. Mrs. Esquire believes you shouldn’t serve your guests a “turd.” She’s probably right about that. Plus, we’re entering 18 years of “we don’t say that word in our house.” We haven’t drafted the list of “bad words” yet, but using “turd” to refer to food probably won’t fly.
Mrs. Esquire and I went back and forth about what I should call my ABTs. She said I should come up with a new name. I disagreed. You can’t serve a hamburger and call it a ground beef sandwich. It’s hamburger, plain and simple. When I serve ABTs, I don’t want to pretend like I invented the dish. Or, worse yet, I don’t want to serve them to someone in the know and get called out on my fake name. In the end, we settled on a compromise. I can call them ABTs, but if anyone asks, I have to say they’re Atomic Buffalo Tidbits. That’s good enough for me.
So you’re still probably wondering – what are these turd/tidbits? The basic recipe is fairly simple: half a jalapeno, filled with cream cheese, sometimes topped with some sort of meat, and wrapped in bacon. The traditional recipe calls for a Lil’ Smokie on top of the cream cheese.
I didn’t want to use Lit’l Smokies in my ABTs. I’ll admit, Mrs. Esquire and I have become food snobs since we moved to San Francisco. In my days growing up in Minnesota I ate many a hotdish, the central ingredient of which was usually Cream of Mushroom Soup. Now, Mrs. Esquire and I have a philosophy: prepackaged food is not an ingredient. I just couldn’t bring myself to put Lit’l Smokies on my ABTs.
I decided to buy a chorizo sausage instead of Lit’l Smokies . I didn’t know exactly how I was going to use it. I was thinking of cooking the chorizo and laying it in slices across the top of the jalapeno. Then I figured I should see if others have used chorizo. Sure enough, the often-inspiring Griffin’s Grub recently posted a recipe for ABTs with chorizo. I followed his technique.
I split open the chorizo sausage, browned the meat, and mixed it in with some neufchatel cheese (you can use cream cheese if you want).

I sliced each jalapeno in two and scraped out the seeds and the membrane. I then filled each one with the cheese-chorizo mixture. I had a few extra crumbs of chorizo, which I placed on a top of a couple of peppers.

Lastly, I wrapped each jalapeno with some bacon. I used between 1/3 and 2/3 of a slice of bacon on each, with 2/3 being too much, 1/3 being too little, and 1/2 being just about right. I used pepper bacon from Whole Foods, which I think added a nice kick to the finished product. I also dusted them with a barbecue rub. I placed them on a 300 degree Big Green Egg, set for indirect cooking (plate setter legs up), with some hickory chips for smoke.

My company arrived while the ABTs were on the grill. Consequently I didn’t watch the grill as closely as I should have. My temperature ranged from 275 to 350. I kept the ABTs on the BGE for about an hour. There’s no real science to the cooking time or temperature. I think they should be cooked low enough to impart some smoke and long enough for the bacon to crisp. Here’s the final product.

I have to admit, they were way better than I thought they were going to be. Three of us dusted off almost that entire plate. These will definitely become part of the rotation! If I do them for a bigger group I will probably use my raised grill rack so I can cook more. As always, thanks for reading!
T-Bone
This month’s meat CSA delivery included a couple of T-bone steaks. As I pulled one out of the freezer recently, I realized I’d never grilled a T-bone for myself before. Certainly, I’d eaten T-bone steaks, I’d just never bought one at the store. Why not?
I know the reason why. I have a little cheap streak that occasionally rears its head. For example, when I was working construction as a kid I would buy warm 2 liter bottles of soda for $0.99 instead of a 32 oz fountain drink for $0.89. I rode the bus long before I lived in a city where it was “cool” and practical. I sometimes pull the stems off bell peppers in the grocery store so I don’t have to pay for them. Mrs. Esquire is the same way. When we traveled to China I couldn’t get her to stop bargaining over a $0.50 price difference so we could just get on with our day. I guess we’re good for each other that way.
What does this have to do with the T-bone? I think I’ve avoided T-bones because I couldn’t bring myself to pay good money for the bone. Why pay for a steak with a bone in it when you can buy a rib eye or a New York strip? But once again, that’s the great thing about a CSA. It forces you to try different things.
And am I ever glad I grilled this T-bone.
")
This steak was great overall, but I’d forgotten how delicious the tenderloin section of the T-bone can be. Just melt-in-your-mouth-delicious! The best part? I still have one more in the freezer!
As always, thanks for reading.
Vacation grilling
I’m back from vacation! Thanks for coming back to me after my time away.
It turns out you can take the man away from his grill, but you can’t take the grill out of the man. I had quite a few interesting grilling experiences while I was away. While each one probably deserves its own post, I’m going to give you a few quick hits so I can clear my blogging brain and move on to bigger and better things!

We hung out for a week in rural England. I’ve always enjoyed checking out grocery stores and food markets while I’m traveling. Food is a window into culture! Mrs. Esquire got a kick out of me checking out the butcher.
There’s a funny story behind this picture, though. For the first few days, I couldn’t get over how expensive the meat was in England! Eventually I realized an error in my pound/kg to dollars/pound conversion. I multiplying by 2 instead of dividing by 2 when going from kilos to pounds, meaning all my numbers were 4 times too high. I was not about to spend $40 a pound for fresh sausage!

I bought these pork chops at a little village market in England. It was a very interesting cut – they left the skin on! I trimmed the rind off the chop before eating, then threw the rinds back on the grill. My goal was to make chiccarones. Unfortunately I was using a Weber. I closed the vents in hopes that the rind would cook slowly for a good, long time. It was a good idea but they didn’t really turn out. Maybe I’ll keep an eye out for this type of cut and try the chiccarones at home, on my Big Green Egg.

This was Mrs. Esquire’s least favorite night of our trip – and it might have been my favorite. Summer storms in Northern Minnesota can whip up in a flash and knock you on your backside. For a California transplant, a good summer storm is an essential part of a trip back home! We were watching the radar on this night, knowing that the storm was on the way. We needed to make a judgment call: put the salmon on the grill and try to beat the storm? Or wait it out and eat late?
As you can probably guess, we decided to go for it. And, of course, the storm beat us. What a fun time – grilling in the pouring rain, driving wind, and pounding hail! There’s something so primal about cooking food over an open flame in the middle of a storm. Of course, there’s also something primal about a new mother telling a new father not to run around in a lightening storm holding metal things. So there were definitely two perspectives in our cabin regarding the awesomeness of this grilling adventure.

Looking at this picture makes me want to go back to Maine! What a wonderful part of the country. My takeaway from this grilling event? Sure, you can create a gourmet meal with a fancy grill, special fuel, and lots of unique spices. But if you have fresh scallops, olive oil, lemon juice and a mini-Weber, you can still cook up something special.
As the old saying goes, however, “there’s no place like home.” After a long time away from my BGE I was suffering from separation anxiety. So of course I took advantage of a laid-back weekend to smoke up a pork shoulder. Here’s a little treat for you if you’ve never pulled pork.
