Turducken
My Big Green Egg has provided the motivation and opportunity to tackle some pretty big barbeque challenges. Some of my favorites include pulled pork, brisket, and smoked salmon. This holiday season, however, a new favorite rose to the top of the list.
Turducken.
Turducken was definitely a “bucket list” barbeque challenge. My life as a Big Green Egger would feel incomplete if I never made a turducken. I had so much fun learning about turducken, making the turducken, and then, of course, eating the turducken!
The turducken is the ultimate in barbecued poultry. It’s a turkey stuffed with a chicken and a duck. You can purchase an assembled turducken – especially if you live in Louisiana or other parts of the South – but in my mind the assembly is part of the experience.
That said, there are limits to what I can and will do. The first step in building a turducken is to debone a whole chicken and a whole duck. If you are truly ambitious you can do this yourself and can find instructions on how to do so on YouTube. I chose to delegate this task to my butcher. You will also need to remove all the bones from the turkey, except for the leg and wing bones. I also had my butcher do this for me.
In addition to your deboned birds, you will need stuffing. Mrs. Esquire put together the stuffing for me. It was made from chicken sausage and various types of breads. One tip I read online – make sure your stuffing is moist. Dry stuffing will impede the transfer of heat between the birds.
Lastly, you’ll need a rub. I used Emeril’s Essence. Once you have your birds, stuffing and rub, you are ready to assemble.

I have to pause here for a quick confession. Despite the fact that I ordered my meat a month in advance, the butcher didn’t have a whole duck. Frustrating! So instead I used duck breasts.
The first step in assembly is to rub down the chicken and duck, and to put some rub on the inside of the turkey. Next, you put a layer of stuffing in the turkey. You can see that the skin on top of the turkey is intact. I was considering cutting the turkey all the way open, but I’m glad I didn’t. That skin was very helpful in keeping the bird together while I stuffed it.
I wanted my duck in the middle. Since my bird is laying breast down, I put the duck in next. After the duck is another layer of stuffing, then it’s time for the chicken. Lastly, you should fill all the crevices with stuffing.
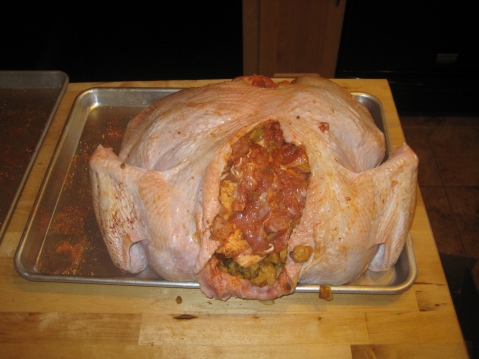
Here’s the bird, fully stuffed.
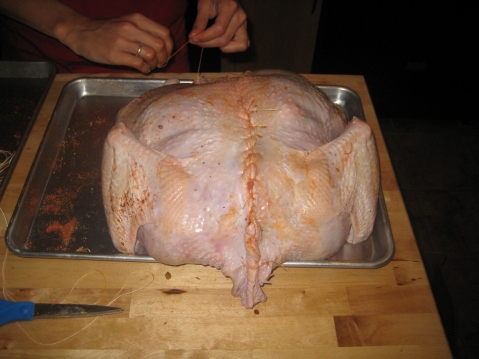
The next step is to perform a little reconstructive surgery on the turducken. Mrs. Esquire helped me with this step – she’s very handy with a sewing needle. We used cotton string to sew the bird back up and truss the legs.
Lastly, I mixed some Emeril’s Essence with margarine (we had kosher guests). I rubbed the margarine between the skin and the breast, and also over the top of the bird. I allowed the bird to come to room temperature prior to the cook, but also iced down the turkey breasts with bags of ice as it was sitting out. I picked up this tip online – the hope is to keep the breasts a little cooler than the rest of the bird so they won’t cook too fast.
It was quite a bit of prep work, but I truly believe it was worth it. Cooking a turducken is a little complicated, and it helped to know the many layers of my bird as I was monitoring the cooking process.
There’s a wide variety of turducken cooking times and temperatures floating around the internet. I decided on 300 degrees, Big Green Egg set for indirect cooking, with a little cherry wood for smoke. I was guessing I’d have a 5-7 hour cook. A good drip pan is also essential. I used a double-drip pan method (with one drip pan on to the grill and two more below the grill, on the plate setter) in hopes of getting some early drippings for gravy.

It’s go time!
In preparation for this cook I bought myself a thermapen instant-read thermometer. I now have quite the collection of thermometers. Some serve different purposes and some I just don’t like. The thermapen is a top of the line instant-read thermometer. I wanted it for this cook because I needed to quickly check the temperature at various parts of the bird without leaving the lid open too long.
The thermapen worked great, but it told me that my bird was cooking much more quickly than I wanted! The turkey breasts were climbing faster than the interior of the bird (as expected) and were inching close to 160 after three hours. The interior still had a ways to go.
At this point I knew I would have to pull the bird at least two hours before we were ready to eat it. I decided to use the old barbecue trick of putting it in a cooler, wrapped in foil and blankets, to rest. Not ideal but I hoped it would work. After about four hours, the interior was up over 150. Counting on significant temperature rise during the two hours in the cooler, I pulled the bird at that point.
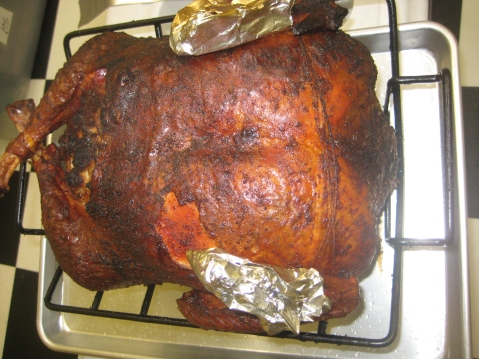
Ready for the cooler! (Oh, by the way, did I mention that I was doing this all in a massive rain storm? Not ideal!)
When I opened the cooler two hours later, a huge gush of steam rushed out. In retrospect, I should have pulled the bird from the cooler about 15-30 minutes before carving it. I didn’t re-check the temperature (too busy!) but I’m sure the breasts were much warmer than I would have liked.
Carving a turucken is tons of fun. Since there are hardly any bones, you can just go at it like a meatloaf. When I sliced into my turducken, I was greeted with this beautiful sight.

The turducken was a huge hit. Even though my temperature got a little higher than I wanted, and even though I had to pull the bird early, it still was moist enough. I would have liked to try it after a more normal resting period. The turkey was, predictably, drier than the other meats. But when you swished the turducken all together on your plate it was pretty darn good. I’ll definitely make turducken again!
As always, thanks for reading!
Caveman Grilling
My mother-in-law bought me a great grilling cookbook for my birthday: Charred and Scruffed, by Adam Perry Lang. The author has a unique take on grilling with lots of interesting ideas and techniques. I’m not going to delve into deep detail on this blog when I use his recipes and techniques. If you’re interested in learning more, buy his book!
When I first opened the book, I was immediately drawn to a technique he called “clinching.” The author grills meat directly on the coals! How barbaric! How exciting!
I had to try this right away. I used New York Strip steaks at the recipe’s suggestion. I had two steaks to cook but I decided not to cook them both at the same time. In case of utter failure, I didn’t want to go home hungry.
I was so excited about this process, Mrs. Esquire came out to watch. Spectator grilling! The first steak worked out great. Mrs. Esquire then had the great idea to start filming the action. I was reluctant at first, but the video ended up being pretty interesting.
Now bear in mind, I didn’t start this cook with the intention of putting out a video. I would have done a little more explaining along the way if I’d been thinking about it. I also would have spent a little more time in hair and makeup. But I invite you into my backyard as I “clinch” my second New York Strip Steak. Video Here.
Here’s a photo of the steak down in the coals.

This was really a fun technique. The steaks tasted great, too! Chef Lang is a little heavy on the salt for my palate, so I’ll adjust that going forward, but the steaks had a really nice charcoal flavor. I can’t wait to play with more of his techniques!

Vacation grilling
I’m back from vacation! Thanks for coming back to me after my time away.
It turns out you can take the man away from his grill, but you can’t take the grill out of the man. I had quite a few interesting grilling experiences while I was away. While each one probably deserves its own post, I’m going to give you a few quick hits so I can clear my blogging brain and move on to bigger and better things!

We hung out for a week in rural England. I’ve always enjoyed checking out grocery stores and food markets while I’m traveling. Food is a window into culture! Mrs. Esquire got a kick out of me checking out the butcher.
There’s a funny story behind this picture, though. For the first few days, I couldn’t get over how expensive the meat was in England! Eventually I realized an error in my pound/kg to dollars/pound conversion. I multiplying by 2 instead of dividing by 2 when going from kilos to pounds, meaning all my numbers were 4 times too high. I was not about to spend $40 a pound for fresh sausage!

I bought these pork chops at a little village market in England. It was a very interesting cut – they left the skin on! I trimmed the rind off the chop before eating, then threw the rinds back on the grill. My goal was to make chiccarones. Unfortunately I was using a Weber. I closed the vents in hopes that the rind would cook slowly for a good, long time. It was a good idea but they didn’t really turn out. Maybe I’ll keep an eye out for this type of cut and try the chiccarones at home, on my Big Green Egg.

This was Mrs. Esquire’s least favorite night of our trip – and it might have been my favorite. Summer storms in Northern Minnesota can whip up in a flash and knock you on your backside. For a California transplant, a good summer storm is an essential part of a trip back home! We were watching the radar on this night, knowing that the storm was on the way. We needed to make a judgment call: put the salmon on the grill and try to beat the storm? Or wait it out and eat late?
As you can probably guess, we decided to go for it. And, of course, the storm beat us. What a fun time – grilling in the pouring rain, driving wind, and pounding hail! There’s something so primal about cooking food over an open flame in the middle of a storm. Of course, there’s also something primal about a new mother telling a new father not to run around in a lightening storm holding metal things. So there were definitely two perspectives in our cabin regarding the awesomeness of this grilling adventure.

Looking at this picture makes me want to go back to Maine! What a wonderful part of the country. My takeaway from this grilling event? Sure, you can create a gourmet meal with a fancy grill, special fuel, and lots of unique spices. But if you have fresh scallops, olive oil, lemon juice and a mini-Weber, you can still cook up something special.
As the old saying goes, however, “there’s no place like home.” After a long time away from my BGE I was suffering from separation anxiety. So of course I took advantage of a laid-back weekend to smoke up a pork shoulder. Here’s a little treat for you if you’ve never pulled pork.
Pork Chops Part Deux
Well, the little guy joined us last week! Mrs. Esquire and I are very happy to be parents. Here’s hoping I’m able to keep going with this blog through the sleepless nights.
Today I want to write about pork chops. I have to remind myself again that the point of this blog is to learn and grow with my Big Green Egg. So, despite my previous post called Pork Chop Perfection, I’ve decided to change my strategy on pork chops.
I used to sear the pork chops on the cast iron grill then move them over to the half-moon stone to finish up. The goal was to allow them to cook long enough without too much direct flame.

The process worked pretty well – most of the time. About half the time, however, I ended up with dry chops. Some of my issues probably resulted from overcooking. But with such a low success rate I decided it was time to explore other options.
Last Saturday was my first cook as a dad. I removed some nice thick CSA chops (no goat this month) from the freezer. The new strategy was to grill them direct at a little lower temperature.

As an interesting side note and challenge, it was incredibly windy Saturday night. I had to clamp everything down pretty tight to keep the temperature at about 350-375. The wind forcing its way through the small openings stirred up quite a bit of smoke – a neat effect at a high temperature. The smoke added some nice flavor.
I cooked these pork chops for about 15 minutes at 350-375. They turned out much better than my previous chops (also from the CSA, grilled only a week or two before). Moist and delicious.
So there you have it. I’ve officially refined my technique.
To Build A Fire
I’ve been semi-obsessed with honing my pork shoulder skills in the last few months. I guess part of me feels like I won’t be complete until I can consistently crank out a solid pork shoulder. Plus pulled pork is cheap and it always makes for good eating, so why not go for it?
But I think there’s more to my pulled pork obsession than my drive for legitimacy. I’ve been putting my pork shoulder on the Big Green Egg early in the morning, rather than late at night. I’ve come to realize that I derive perverse enjoyment from rising at 5 am on a Sunday to play with my Egg.
I’ve been an early riser since before I can remember. When I was a toddler, I would apparently get up before dawn and rummage through the bread drawer for stale hot dog buns. Later in my childhood, I would watch G.I. Joe at 6 am with the sound off. I had to be sneaky since I wasn’t allowed to watch that show. In middle school, I would wake up an hour early and read a book until it was time to get ready for school. In junior high, my dad would sometimes take us ice fishing. Even though I didn’t really like to fish growing up, there was something magical about waking up before dawn in the middle of winter and going ice fishing.
My early rising tendencies have continued into adulthood. In fact, I’ve started drafting this post in a hotel room in New Jersey at 5:30 a.m. because I’m all out of whack from taking the red eye yesterday and I can’t sleep. So when I have a free Sunday, I look forward to setting my alarm for 5:00 and puttering with my Big Green Egg. It’s just a part of who I am.
Last Sunday I gave it another go. My biggest challenge recently has been my fire. I’ve lost my fire a couple of times along the way each of the last two times I’ve smoked a pork shoulder. I finally got it right this time.
Previously, I was relying on a very detailed fire-building technique posted by a prominent BBQ blogger. To protect the innocent, I won’t name names here. Maybe I was doing it wrong. Maybe I missed a step. But for whatever reason, it just wasn’t working for me.
I had a breakthrough when I attended EggtoberWest. First, the folks at EggtoberWest filled my BGE with way more charcoal than I usually use. This was an eye-opener. Of course it makes sense – I was losing my fire because I wasn’t using enough charcoal. So this time I piled the charcoal in, all the way to the top of the fire box.
(Sorry, I didn’t take any pictures of the fire building process. Not on my radar screen at 5:00 a.m.)
Second, I received some good advice from my new friends at Dixie Q. It seems like everyone recommends starting your fire in the middle of your pile of charcoal. This is what I was doing. However, this technique caused problems for me because the fire would burn through the coals in the middle of the egg before it reached the coals on the edges. No good. The folks at Dixie Q recommended splitting one fire starter into four small chunks and placing the chunks in a diamond formation in the charcoal. Another brilliant idea.
In the end, my fire performed admirably for a nice, long, 12 hour smoke! My pulled pork was better than ever.

I’m still not ready to post details about technique, although I’m honing in a good North Carolina-style product. I will give you a “recipe recap” on my fire building technique, though!
Recipe Recap
A good, solid fire is very important when smoking low and slow. Here is my fire building technique.
Start by giving your BGE a good, thorough cleaning. Remove all the old charcoal from the fire box and clean all the ash out of the bottom of the BGE. But don’t stop there. If you haven’t done so recently, you should remove the fire ring and the fire box from the BGE and clean out any charcoal that was stuck between the firebox and the walls of the egg. You want maximum airflow for this fire. (Note: check out the components of the BGE here if you’re unclear about the difference between the “fire box” and the “fire ring.”)
After you reassemble your egg, fill the fire box to the top with charcoal. Open the bottom vent. Split one BGE fire starter into four pieces and place them in a diamond formation in your charcoal. Light the fire starters.
After the fire starters have been burning with a high flame for a 5-10 minutes, and when the charcoal near the fire starters begins to burn, put the Plate Setter in place and close the top of your Big Green Egg. Wait for the temperature to rise to about 200 degrees. When the temperature reaches 200, start closing the bottom vent and top vent gradually as the temperature continues to rise. Stabilize the temperature at 250. Then . . . wait.
After the temperature has been stabilized at 25o for 10 minutes or so (one suggestion is to wait until the outside of the BGE begins to feel warm), you’re ready to go. Open the lid, add wood chips if you so desire, place the grill on the plate setter, and you’re off and running.
Happy smoking!
Simply Steak
No pictures tonight, just straight facts.
Tonight was my second opportunity to grill steak on the cast iron grill. Last weekend’s steak was good. Tonight’s was mind-blowing.
If the seasoning of one meal on the cast iron grill makes this much of a difference, I can’t wait to taste my food after using the cast iron grill for a year.
The tip I garnered from tonight’s steak is pretty simple and common sense: buy your steak thick with a good bit of fat. I chose a thick New York Strip tonight. I picked a steak with a nice rim of fat along the edge, but minimal marbling through the middle. The Whole Foods butcher offered to cut my steak into two so it would be thinner. I declined.
The thickness and fat are very important. The thickness allows you to grill the steak long enough to garner some serious char from the cast iron grill without overcooking your steak. The fat provides some flare-up to give your steak that quick-fired flavor. I used Montreal Steak seasoning, which I absolutely love. Every bite of the steak was delicious, with the still-hot char coloring the flavor of the beef. Steak heaven.
New Toys
So EggtoberWest had its commercially-intended effect on me. I bought four new things: two new side-wings for the Egg, a cast iron grill, and a raised grill extender. I used three of the new toys tonight.
First, the new side wings. These are awesome. They look great and they are so functional! Before I bought these, I was constantly juggling my food and tools. No more – plenty of room now!

I also used my new cast iron grill tonight. The cast iron grill is best used for short and hot grilling. Tonight was steak and grilled onions – the perfect opportunity. The grill did its job. Solid grill lines, delicious quick and hot cooking, and a great final product.

One tip I picked up at EggtoberWest – set the cast iron grill crosswise on top of your porcelain coated grill. This will prevent vegetables and other small items from falling through the grill.
So for tonight, I fired the egg up to 550. I put the onions on first, grilling them for about 12-14 minutes total. The steak stayed on for 8 minutes – 2 minutes then flip, twice on each side. Flipping twice allows for criss-crossed grill marks if you want them.

I’m very happy with the new cast iron grill. A delicious dinner on a night when I was home alone!

EggtoberWest – The Aftermath
We had a great time at EggtoberWest yesterday! It was my first cooking festival. I’d never prepared food for strangers like that. Nor have I ever spent so much time talking to strangers about what I do on my Big Green Egg. In another setting I might have been intimidated. But the people at the festival – attendees and hosts alike – we’re so fun and laid back, it was easy for a novice like me to fit right in.
Mrs. Esquire prepared some signs for our tent, so BBQ Esquire was well represented.

As noted on the sign, I prepared my Belgian Beef Stew, from the Big Green Egg cookbook. It was fun to talk people through the process – grilling the bacon, sauteing the vegetables, browning the beef, and simmering in the beer (you’ll have to buy the cookbook for the full recipe, sorry).


The stew was generally well received. One skeptical gentleman asked my why I would bother making a stew on the Big Green Egg, since the pot has a lid. It was a good question. I told him the bacon, vegetables and beef saute in an open pan, which allows the flavors of the BGE to do their work. Also, I like doing it because it’s a challenge. It’s just fun to cook a stew on a grill!
After the stew was gone I grilled some beets and turnips in my redware. Folks really liked those, too!


All in all, it was a great event! A big thanks to the folks at Sierra Select Distributors for hosting! Mrs. Esquire and I hope to return next year!
EggtoberWest!
I’m so excited about this weekend! I’ll be attending EggtoberWest in Sacramento! EggtoberWest is a Big Green Egg celebration festival. I’ll have my own tent and Big Green Egg all day Saturday. I’m planning to cook my beef stew as well as turnips and beets on my Mexican redware. I’ll try to post during or soon after the event!
![]()
Meat Thermometers
Finding a reliable meat thermometer has been a continual struggle. I think I’m finally getting there.
My first meat thermometer was the leave-in style with a large dial. It worked OK the first couple of times I used it. Soon enough, however, it began to fail me. I began doubting the thermometer when I noticed the reading dropping as soon as I took the meat off the grill. It shouldn’t be affected by the temperature of its environment, right? After a couple frustrating outings, I decided it was time for a new thermometer.

Thermometer Number 1
The next time I visited my favorite butcher, Drewes Brothers, I asked the guys about meat thermometers. They recommended the instant read, small dial type. I went out and bought one.

Thermometer Number 2 Next To Thermometer Number 1
Thermometer Number 2 was a nice upgrade from Thermometer Number 1! It seemed to give fairly accurate readings. However, it had its limitations. Its biggest shortcoming is that it doesn’t work well for low and slow cooking. You have to open the lid and leave it open each time you want to check the temperature. As the saying goes, “looking isn’t cooking,” so I needed another solution for barbeque.
This brings me to my current favorite: a Maverick Redi-Check remote thermometer.

Thermometer Number 3
I love this thermometer! First, and most importantly, it seems to give an accurate read when cooking low and slow. Second, there’s a remote unit you can carry on your belt! I take this unit upstairs with me when I leave the backyard. It allows me to keep an eye on my cooking from afar.
Thermometer Number 3 is not without its limitations, though. I’ve heard the probe and cord are susceptible to high temperatures. This means it is best used for low and slow cooking. Also, the probe needs a good solid hunk of meat. I tried using it in a fish and it wasn’t accurate.
So, after all of this, I’ve come to the conclusion that there isn’t a perfect meat thermometer. I’ll be using my redi-check for pulled pork, chicken, etc. I’ll use the instant read for other cooking. And sometimes, there’s no substitute for the gut test – you just know when it’s done.
Tips For Accurate Thermometer Readings
- Figure out how far your thermometer needs to be inserted. The instant read types can be inaccurate if they’re inserted too far or not far enough.
- Stick the thermometer into the center of a meaty portion of your cut. Putting the thermometer into fat, or near bone, will lead to an inaccurate reading.
- Don’t stick the thermometer in too far! I once put the thermometer straight through a pork chop to the grilling stone below. The temperature flew up!
- Use the thermometer as a guide. There’s no substitute for knowing your grill and knowing your meat.
